Aleonymous (talk | contribs) (Expanded some) |
Aleonymous (talk | contribs) (Added victory/defeat conditions section) |
||
| (5 intermediate revisions by 2 users not shown) | |||
| Line 1: | Line 1: | ||
{{stub}} |
{{stub}} |
||
| − | |||
| − | |||
This article describes how battles play out in the ''The Banner Saga''. |
This article describes how battles play out in the ''The Banner Saga''. |
||
| Line 8: | Line 6: | ||
==Assemble Your Heroes== |
==Assemble Your Heroes== |
||
[[Image:AssemblingHeroes.jpg|600px|right|Assembling Your Heroes for battle]] |
[[Image:AssemblingHeroes.jpg|600px|right|Assembling Your Heroes for battle]] |
||
| − | Whenever a battle is about to be engaged, you are firstly directed into the 'Assemble Your Heroes' screen. Here, you can select the [[characters]] you are going to field in the imminent battle. You can |
+ | Whenever a battle is about to be engaged, you are firstly directed into the 'Assemble Your Heroes' screen. Here, you can select the [[characters|heroes]] you are going to field in the imminent battle. You can have up to 6 heroes in your 'roster', which displayed in the top row of the screen. The portraits of the currently available heroes are displayed in the second (and third) row of the screen, where the greyed-out ones are already in your active roster. Using drag-and-drop you can add or remove heroes from the roster or change their acting order; the first hero to act is the one on the left. |
| − | When you are done, click on the 'Ready!' button to proceed to the battle itself. |
+ | When you are done, click on the ''''Ready!'''' button to proceed to the battle itself. |
| − | + | ====Notes/Tips==== |
|
| − | * The Rank of your |
+ | * '''Rank''': The Rank of your heroes, 1-5, is shown in the red-circle on the bottom-right corner of their portraits. |
| − | * The golden-ring displayed |
+ | * '''Items''': The golden-ring displayed inside a hero portrait means that he/she has an [[items|item]] equipped. |
| − | * |
+ | * '''Injuries''': Heroes that were knocked-out in previous battles carry injuries. If you choose them for this battle, they will start with a lower [[Strength]], suffering a penalty equal to the number of days left until their full recovery. |
| + | * '''View Heroes & Items''': The 'Assemble Your Heroes' screen resembles to the 'Heroes' menu, accessed through the Camp/Town/Village interface. You can check your heroes' [[stats]], promote them and re-assign items by clicking on their portraits. |
||
| ⚫ | |||
| + | * '''Order''': The order in which your heroes are placed is important; drag-and-drop the portraits to change it. Typically, you want to have your 'damager' (high Strength) units acting after your 'breaker' (high [[Break]] and [[Armor]]) units. |
||
| − | * The 'Assemble Your Heroes' screen resembles to the 'Heroes' menu, accessed through the Camp/Town/Village interface. However, here, you cannot check your characters' [[stats]], neither promote them, nor change their equipped items. With the enemies upon you, time is pressing and only minimal changes can be made! It is advisable that you perform the above actions right after each battle, so that your team is ready when a new fight is joined. |
||
| − | * |
+ | * ''' First Turn''': When a battle starts you are always given the first turn; your leftmost hero will be the first unit to move and attack. This can give you a significant first-hit advantage: If your style is aggressive, you would want to use a high Strength warrior in this slot, like [[Gunnulf]] or [[Hakon]]. |
| ⚫ | |||
====Factions==== |
====Factions==== |
||
| Line 30: | Line 29: | ||
==Initial Deployment== |
==Initial Deployment== |
||
[[File:TBS_DeploymentZones.png|right|600px]] |
[[File:TBS_DeploymentZones.png|right|600px]] |
||
| − | After you have |
+ | After you have assembled your heroes and passed through the loading screen, you are transferred into the battle field. The enemy-unit positions are revealed and you are required to deploy your units anywhere you want on the zones marked with the blue tiles. Click on any ally unit (or on its portrait) to select it, and then click on a valid blue-tile to place it. Deployment is not time-limited. |
| + | When you are done positioning your units, click on the '''Ready!''' button (top of the screen) to proceed to the Battle. |
||
| ⚫ | |||
| + | |||
| ⚫ | |||
| ⚫ | |||
| ⚫ | * |
||
| + | * '''Deployment zones''': The figure on the right presents some of the most typically encountered zones, with blue tiles; enemy units might be positioned in any of the grey tiles. |
||
| − | * You can view any '''unit stats''' by clicking on them. However, movement ranges are ''not'' shown, so you will have to memorize them, or keep a safe distance. |
||
| ⚫ | * '''Difficulty''': The zones are presented in approximate order of difficulty, with the top-left (bottom-right) considered the easiest (hardest). The criteria to assess the deployment zone difficulty are, firstly, the number of available tiles for deployment and, secondly, the neighboring sub-zones where you can deploy your units in robust formations without having enemy units in-between. |
||
| − | * |
+ | * '''Enemy team''': Take your time to examine the enemy team units and their deploymenent. You can view any unit's stats and abilities by clicking on them. However, '''movement ranges''' are ''not'' shown, so you will have to memorize them and try to keep a safe distance from enemy units. That is because you do not know the enemy unit '''initiative order'''. This should be taken into account when positioning low-Armor allies close to high-Strength enemies. Having a zone-control unit, like a [[Oddleif|Skystriker]], in the first turn-slot of your team is a good idea. |
| − | * In general, it is advised to place your units '''closely together''' (so that they can 'cover' each other) and '''far from clusters of enemy units'''. |
||
| ⚫ | * '''Importance''': The initial deployment stage is critical for the success of the battle. You should generally spend some time devising your engagement plan, considering the order of your units while you position them. In general, it is advised to place your units '''closely together''' (so that they can 'cover' each other) and '''far from clusters of enemy units'''. |
||
====Factions==== |
====Factions==== |
||
These are the difference of the deployment phase for [[Factions]] (compared to the ''Saga''): |
These are the difference of the deployment phase for [[Factions]] (compared to the ''Saga''): |
||
| − | * The deployment zones in Factions are much '''less varied''' and all resemble the "Sides" |
+ | * The deployment zones in Factions are much '''less varied''' and all resemble the "Sides" variants displayed in the figure above. |
* Deployment is '''timed''', giving you 60 seconds to decide where to place your 6 units; you can always click on "Ready!" when you are done. |
* Deployment is '''timed''', giving you 60 seconds to decide where to place your 6 units; you can always click on "Ready!" when you are done. |
||
| − | * The units of the enemy player are '''hidden''' during the deployment phase; a lot of ''"metagaming"'' is involved |
+ | * The units of the enemy player are '''hidden''' during the deployment phase; a lot of ''"metagaming"'' is involved in this phase, trying to guess where the enemy will deploy. |
* The player who '''acts first''' depends on the map; for all five [[maps]] currently available, the player to act first is the one who deploys on the top side (NE or NW). |
* The player who '''acts first''' depends on the map; for all five [[maps]] currently available, the player to act first is the one who deploys on the top side (NE or NW). |
||
| Line 61: | Line 61: | ||
* Attack / Select target / Choose between Strength and Break / Increase damage with Willpower / Confirm |
* Attack / Select target / Choose between Strength and Break / Increase damage with Willpower / Confirm |
||
* Rest (or Terminate turn) / Confirm |
* Rest (or Terminate turn) / Confirm |
||
| + | |||
| + | ==Victory or Defeat== |
||
| + | In the first part of ''The Banner Saga'', you must knock-out all enemies to win a battle; the same goes for the enemy team! There is only one battle in the game with a different Victory objective... |
||
| + | |||
| + | In the second part of ''The Banner Saga'', several battles have alternative Victory conditions (objectives), for instance: |
||
| + | * Defeat the leader (key unit) of the enemy team, without the need to defeat all enemies. |
||
| + | * Destroy all the [[Destructible Blockers|obstacles]] blocking a part of the board, while wave after wave of enemies falls upon you. |
||
| + | * [[Training Scenarios]] that require you to perform specific actions. |
||
| + | The defeat condition in story battles is always the same: Have all your Heroes knocked out. Training Scenarios can be failed in various ways. |
||
==Aftermath== |
==Aftermath== |
||
| Line 70: | Line 79: | ||
==Strategies== |
==Strategies== |
||
References to tactics, strategies and other helpful material. For example: [[Guides:Tactical Strategies]] |
References to tactics, strategies and other helpful material. For example: [[Guides:Tactical Strategies]] |
||
| + | |||
| + | [[Category:The Banner Saga]] |
||
Latest revision as of 22:19, 13 July 2016
This article describes how battles play out in the The Banner Saga.
Battles in Factions share a lot of common aspects with the single-player game so, in the end of each section, the differences of the two games will be highlighted and discussed.
Assemble Your Heroes[ | ]
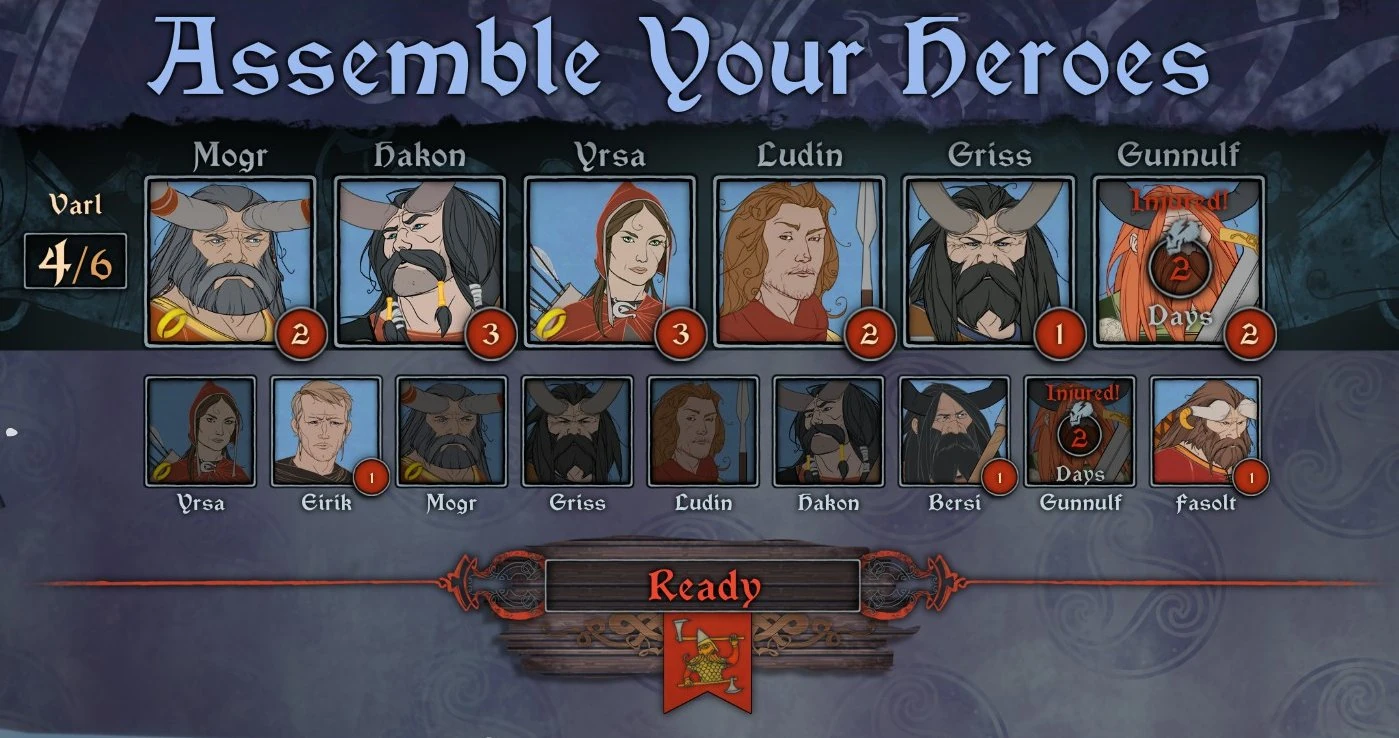
Whenever a battle is about to be engaged, you are firstly directed into the 'Assemble Your Heroes' screen. Here, you can select the heroes you are going to field in the imminent battle. You can have up to 6 heroes in your 'roster', which displayed in the top row of the screen. The portraits of the currently available heroes are displayed in the second (and third) row of the screen, where the greyed-out ones are already in your active roster. Using drag-and-drop you can add or remove heroes from the roster or change their acting order; the first hero to act is the one on the left.
When you are done, click on the 'Ready!' button to proceed to the battle itself.
Notes/Tips[ | ]
- Rank: The Rank of your heroes, 1-5, is shown in the red-circle on the bottom-right corner of their portraits.
- Items: The golden-ring displayed inside a hero portrait means that he/she has an item equipped.
- Injuries: Heroes that were knocked-out in previous battles carry injuries. If you choose them for this battle, they will start with a lower Strength, suffering a penalty equal to the number of days left until their full recovery.
- View Heroes & Items: The 'Assemble Your Heroes' screen resembles to the 'Heroes' menu, accessed through the Camp/Town/Village interface. You can check your heroes' stats, promote them and re-assign items by clicking on their portraits.
- Order: The order in which your heroes are placed is important; drag-and-drop the portraits to change it. Typically, you want to have your 'damager' (high Strength) units acting after your 'breaker' (high Break and Armor) units.
- First Turn: When a battle starts you are always given the first turn; your leftmost hero will be the first unit to move and attack. This can give you a significant first-hit advantage: If your style is aggressive, you would want to use a high Strength warrior in this slot, like Gunnulf or Hakon.
- Forced Heroes: In some special battles you cannot remove certain heroes from your team; a message will appear if you try to remove them. There are only a few instances where this happens, triggered by story-related events.
Factions[ | ]
In Factions, you prepare your team in the Proving Grounds and there are no such features as injuries or items. Also, restrictions apply for the number of units you can bring in your team:
- Exactly 6 units (not less).
- No more than 3 Archer-class units.
- No more than 3 Raider-class units.
- No more than 2 Varl-race units (Warrior- and Shieldbanger-class units)
Finally, a Power is applied to each team in Factions, which equals the sum of the Ranks of the six units and ranges between 0-18. For fairness' sake, the game's Matchmaker usually pairs you against a team of equal power.
Initial Deployment[ | ]
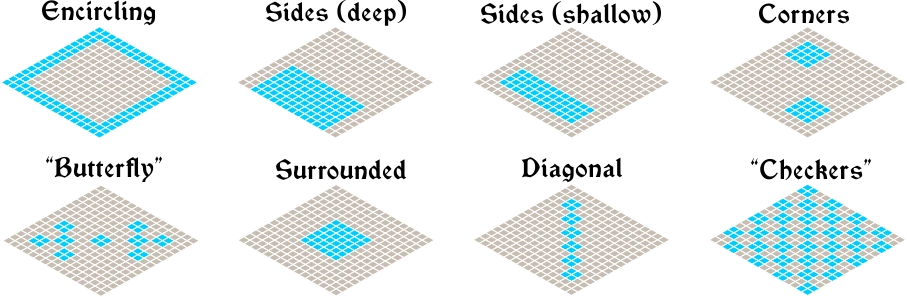
After you have assembled your heroes and passed through the loading screen, you are transferred into the battle field. The enemy-unit positions are revealed and you are required to deploy your units anywhere you want on the zones marked with the blue tiles. Click on any ally unit (or on its portrait) to select it, and then click on a valid blue-tile to place it. Deployment is not time-limited.
When you are done positioning your units, click on the Ready! button (top of the screen) to proceed to the Battle.
Notes/Tips[ | ]
- Deployment zones: The figure on the right presents some of the most typically encountered zones, with blue tiles; enemy units might be positioned in any of the grey tiles.
- Difficulty: The zones are presented in approximate order of difficulty, with the top-left (bottom-right) considered the easiest (hardest). The criteria to assess the deployment zone difficulty are, firstly, the number of available tiles for deployment and, secondly, the neighboring sub-zones where you can deploy your units in robust formations without having enemy units in-between.
- Enemy team: Take your time to examine the enemy team units and their deploymenent. You can view any unit's stats and abilities by clicking on them. However, movement ranges are not shown, so you will have to memorize them and try to keep a safe distance from enemy units. That is because you do not know the enemy unit initiative order. This should be taken into account when positioning low-Armor allies close to high-Strength enemies. Having a zone-control unit, like a Skystriker, in the first turn-slot of your team is a good idea.
- Importance: The initial deployment stage is critical for the success of the battle. You should generally spend some time devising your engagement plan, considering the order of your units while you position them. In general, it is advised to place your units closely together (so that they can 'cover' each other) and far from clusters of enemy units.
Factions[ | ]
These are the difference of the deployment phase for Factions (compared to the Saga):
- The deployment zones in Factions are much less varied and all resemble the "Sides" variants displayed in the figure above.
- Deployment is timed, giving you 60 seconds to decide where to place your 6 units; you can always click on "Ready!" when you are done.
- The units of the enemy player are hidden during the deployment phase; a lot of "metagaming" is involved in this phase, trying to guess where the enemy will deploy.
- The player who acts first depends on the map; for all five maps currently available, the player to act first is the one who deploys on the top side (NE or NW).
Battle[ | ]
Description of the HUD
- Turn queuing / Normal and Pillage Mode
- Unit stats
- Active effects / Ability descriptions / Equipped item descriptions
- Movement-ranges
- Horn
- Settings / Toggle Stat-Banners / Toggle Descriptions-Help
Possible unit actions in their turn. Brief description of basic game mechanics
- Blow Horn
- Move / Waypoints / Confirm
- Use Ability / Select target unit or tile (if applicable) / Select Rank / Confirm
- Attack / Select target / Choose between Strength and Break / Increase damage with Willpower / Confirm
- Rest (or Terminate turn) / Confirm
Victory or Defeat[ | ]
In the first part of The Banner Saga, you must knock-out all enemies to win a battle; the same goes for the enemy team! There is only one battle in the game with a different Victory objective...
In the second part of The Banner Saga, several battles have alternative Victory conditions (objectives), for instance:
- Defeat the leader (key unit) of the enemy team, without the need to defeat all enemies.
- Destroy all the obstacles blocking a part of the board, while wave after wave of enemies falls upon you.
- Training Scenarios that require you to perform specific actions.
The defeat condition in story battles is always the same: Have all your Heroes knocked out. Training Scenarios can be failed in various ways.
Aftermath[ | ]
- Renown earned
- Promotions earned
- Knock-outs and injuries
- Wars: Caravan casualties / Second waves / Chance to find items
Strategies[ | ]
References to tactics, strategies and other helpful material. For example: Guides:Tactical Strategies